


Templates
Tools
Learn
Company
Home
Blog
Vintage
Stunning Vintage Logo | Design Tutorial
Stunning Vintage Logo | Design Tutorial
A vintage design is universally beautiful – it never goes out of style. If you want to create a logo, you’ll never go wrong with something inspired by older times.
But vintage designs are notorious for being hard to nail. You need to create just the right lettering, effects, and decorations. Plus, you have to get the colors and effects right, or the graphic will simply look fake.
Fortunately, Kittl makes all this easy. You can take advantage of the handy tools available in the online design maker and get your gorgeous vintage logo done in about 10-15 minutes. If you don’t have Kittl yet, go ahead and grab it now by signing up for free. Then, follow along as we explain the steps to design the perfect vintage logo.
1. Add Text to Your Project
Once you open a new project in Kittl, go to the left sidebar and select ”Add Text.” Then, choose ”Add Headline,” and the text box will appear in the middle of the artboard. The text will say ”Headline” by default – click on it to start typing.
For this example, we wanted to go with a nautical theme, so we typed in ”Blue Ship.” This will be the name of our fictional brewery, but it won’t be the only text in the logo. To add more text, you don’t need to click on ”Add Headline” again. Instead, simply duplicate the text you’ve already entered and edit the copy.
We did precisely that here and changed the copied text to ”Brewing Co.” Then we took the ”Blue Ship” text and made it bigger. For that part of the text, we wanted a more ornate font, so we chose Signmaster Pro.

2. Insert Some Stylish Glyphs
Signmaster Pro is already a fantastic font, but you can make it even better. In ”Text Settings” on the right, go to the glyphs. This option is located under ”Line Height” and marked by a stylized A+.
Once you click the button, you’ll see a selection of special symbols called glyphs. For this project, we searched for the letter B and found one with more flourishes. Then, we inserted the glyph and deleted the original ”B” in ”Blue.” We repeated the same process for the ”P” in ”Ship.”
With the lettering and glyphs in place, we changed the background color to make the design pop. In line with the nautical theme, we chose a deep blue color and made the letters white.

Changing the color of an object or the background is easy in Kittl. Simply select either an element or click on the background and you’ll see the color as the first option in the right-side menu.
3. Create a Frame for Your Text
You can create text frames from various elements in the ”Add Elements” menu. In this example, we navigated to the ”Ornaments” tab and selected two elements from the ”Components” panel.
Kittl already has pre-made frames, but we wanted to create something really elaborate for this graphic. That’s why we took one element for the top and the other for the bottom of the frame.
To insert an element onto the artboard, simply click on it or drag it from the ”Add Elements” menu. Once we placed the elements, we centered them on the canvas. This is also quick and easy with Kittl – simply select both elements and tap the ”Center” button in the ”Group Settings” menu on the right.
After we inserted the frame elements, we also made sure the text was in the front. You can move elements to the front or back by right-clicking them and choosing ”Forward,” ”Backward,” ”To Front,” or ”To Back.” This step is important for our next action with the text.

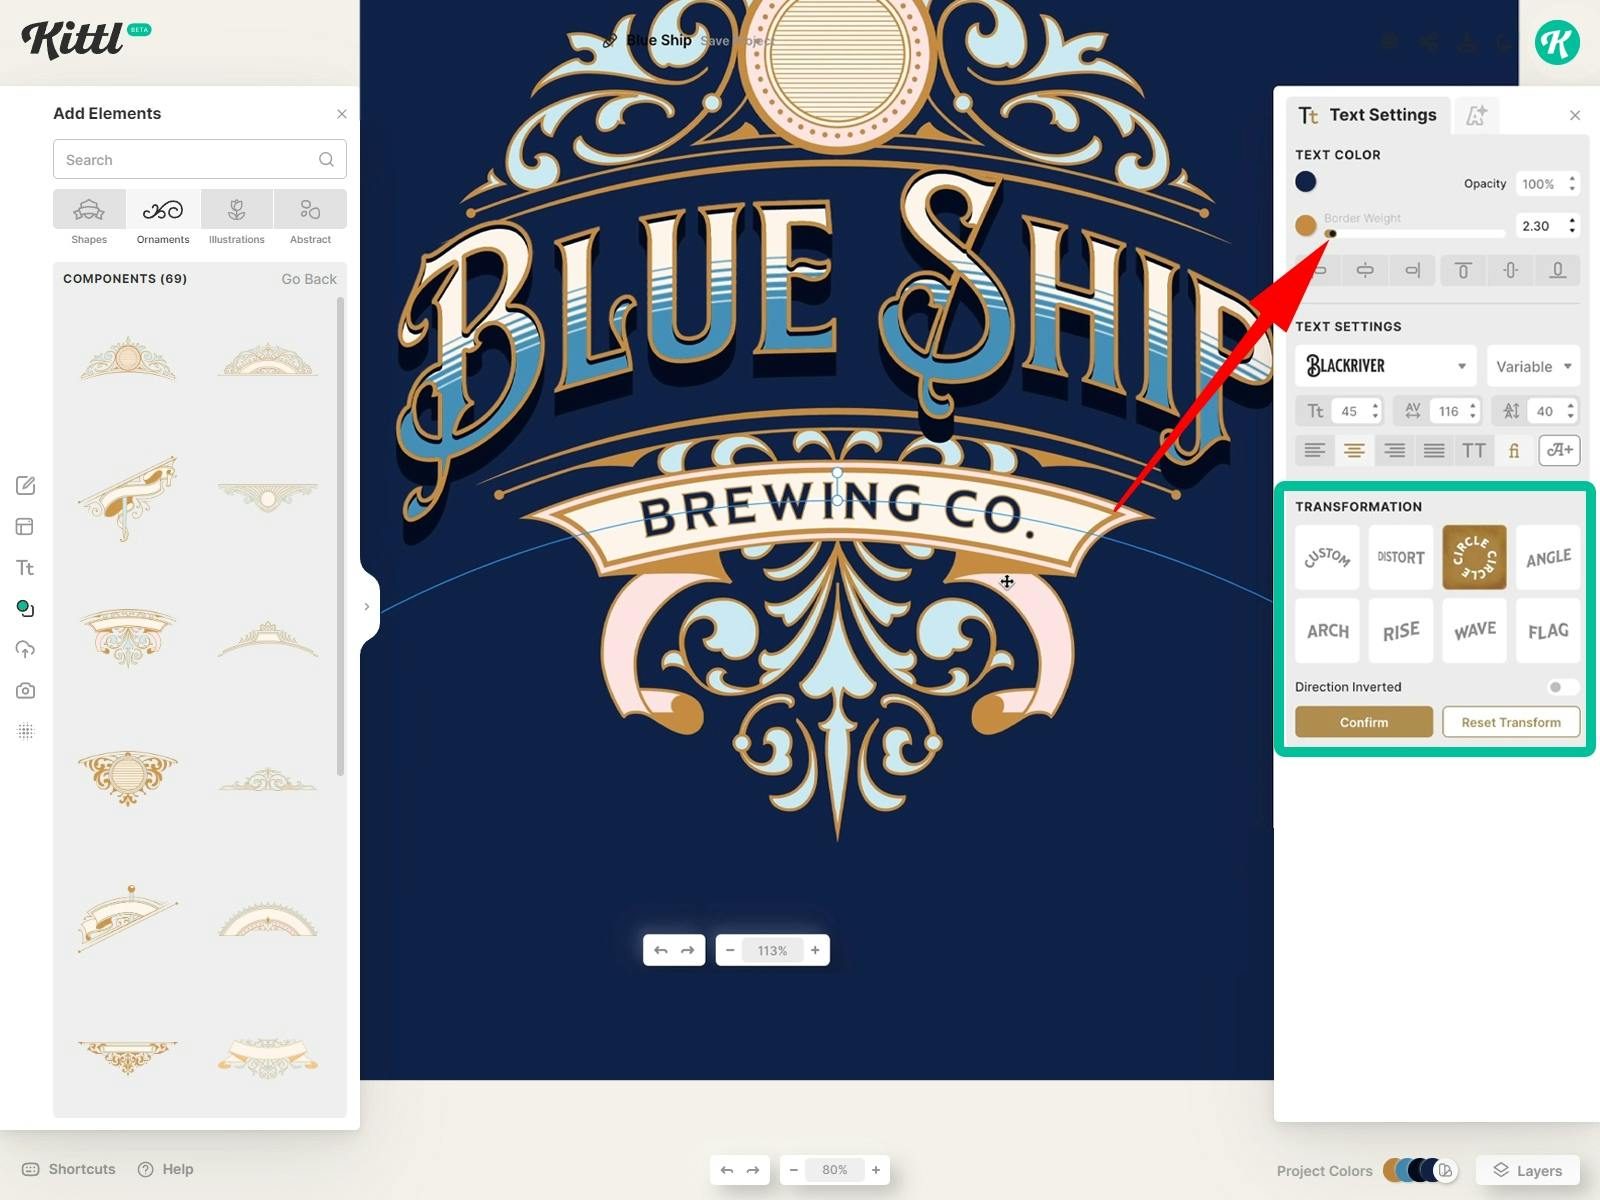
4. Transform the Text
Since our frame has rounded inner edges, we want the text to follow that curve and fit into the shape perfectly. To that end, we first increased the text to fit the height and width of the central space in the frame.
To curve the text, simply use the ”Arch” tool under ”Text Settings” and ”Transformation.” The tool will bend the text automatically and give you several anchor points that you can use to adjust the curve. You can also use the curve slider, located just beneath the transformation options.
In our project, the text only needed a bit of tweaking to fit in perfectly with the frame. Play around with the ”Arch” tool and the anchors, and you’ll get your text right easily.

If you choose a different frame, Kittl has other transformation options to make your text fit into them as well. Try out the Angle, Circle, Rise, or Flag options to see what design you can make with them.
5. Add Vintage Effects
So far, we got a beautiful frame with unique lettering, but our design is still relatively basic. We want to make it more authentic with some crucial details. The text effects will be the first of those.
When you select the text, you’ll see two tabs in the right-side menu: ”Text Settings” and the letter A with a sparkle symbol. This other tab is ”Text Effects” – precisely what you’ll need for this step.
Once you click on ”Text Effects,” you’ll see two categories: ”Shading” and ”Decoration.” In this instance, select the Detailed 3D Shadow – the last option on the right under ”Shading.” This will add a beveled shadow with a lot of detail.
Using the two circles underneath the 3D Shadow button, you can change shadow colors. The first button will change the outline color, while the second will change the actual shadow. We chose a gold color for the outline and a dark blue for the shadow.
With the shadow in place, we went back to ”Text Settings” and changed the text color to a lighter blue. Then, going back to ”Text Effects”, we added other decorations to the mix.
We opted for the ”Fading Color Cut” decoration effect, tweaking the weight and distance sliders to get a gradient effect. We also set the effect color to white, so our lettering is now blue at the bottom and white at the top.
When it comes to the ”Brewing Co.” text, we wanted to leave it fairly basic. So, we placed the text into the bottom part of the frame and used the Circle transformation effect to make it fit.
6. Tweak the Colors
With all of the elements in place, we decided to make all colors match. To do that, we selected all elements and started playing around with the color menus.
The great thing about this method is that Kittl allows you to change colors on all elements at once.

7. Insert Additional Illustrations and Texture
The final step to top off this graphic is to add texture and more illustrations. For the illustrations, we went to the ”Add Elements” menu and searched for ”anchor.” We found a great anchor image and placed it in the round space at the top of the frame.
When it comes to texture, you can use the ”Textures” menu from the left sidebar to find the option that best fits your design. Again, in line with the nautical theme, we chose a marble texture because it reminded us of water drops.
Simply clicking on the texture will apply it to the design. Then, you can play around with the opacity to make the texture as transparent as you want. That’s precisely what we did to wrap up this project.

Create another stunning vintage logo with a similar design template in Kittl – Black Ink Tattoo Studio - Lion Logo Design Template.
Once you’re done with the design as we showcased it here, you don’t have to stop. Feel free to keep exploring Kittl and find different ways to edit and customize your graphic.
Related articles

Vintage
How To Make A Retro Sunset Logo Design
In this video, we're making a logo for an outdoor tour company that takes inspiration from old-fashi...

Vintage
How to Create an ’80s Retro Poster Design | Design Tutorial
Retro never goes out of fashion. Today, retro style is still going strong, especially in poster desi...

Tutorials
How To Make A Vintage Ornate Frame
There's nothing quite like a beautiful vintage frame to add a touch of elegance to your design. And ...