If you’re searching for a fast, easy way to edit photos online without downloading heavy software or learning complicated tools, this guide is for you.
It’s surprisingly easy to make a photo look like it belongs in your design — even if it didn’t start that way. With just a few clicks, you can adjust lighting, clean up distractions, and layer in text or graphics that actually feel intentional.
All of it happens in your browser, no Photoshop, no downloads, or complicated setup.
In this article, you’ll learn:
- Why this browser-based photo editor is quietly replacing the usual go-tos in graphic design workflows
- Learn the editing workflow that turns average photos into design-ready assets—no deep tools required
- Explore the features that make photo editing feel more like designing: from AI cleanup to lighting tweaks and layout-ready exports
- See how designers use these tools to create layered visuals, clean up product shots, and turn photos into editable artwork for client-ready designs.
Let’s dive in!
How this browser-based app quietly became a go-to photo editor for designers
Most graphic designers don’t need a heavy-duty photo editing suite. You’re not color-grading for a magazine spread or retouching portraits like a photographer.
You’re working with stock images, product photos, or digital assets — and you just need them to look right in your design.
Maybe the lighting feels off. Maybe the colors clash with your layout.
Maybe you just want to crop, fade, or strip the background to make it blend better.
That’s where a lightweight, design-focused photo editor like Kittl really shines.
Instead of bouncing between Photoshop, Lightroom, and Illustrator just to prep one image, Kittl gives you everything you need right where you’re already designing. It’s fully online, runs in your browser, and doesn’t make you jump through hoops.
How to edit photos in Kittl: Step-by-step
If you’re a designer working with stock images, product shots, or presentation visuals, you’ve likely searched for a photo editor that helps you tweak things — without switching between three different tools.
Kittl’s browser-based workspace is built for that exact need. And we’ll show you how.
Step 1: Upload your photo

Drag and drop your image onto the canvas. Kittl supports JPG, PNG, WEBP, and SVG. Once added, you can scale, reposition, or align it directly inside your layout.
Step 2: Apply filters and fine-tune the look

Click on the photo and you’ll see adjustment sliders for brightness, contrast, vibrance, hue, and more. You can even remove color selectively to dial in a specific aesthetic.
If you’re working on a carousel, portfolio slide, or moodboard, this helps make different stock photos feel like they actually belong together. Want to apply the same look again later? Save your settings as a photo filter style in your Brand Kit.
Step 3: Remove background or crop

Use Background Remover to isolate your subject in one click — great for mockups, headers, or clean visual layouts. You can also use Reframe to extend the image’s aspect ratio to fit Instagram’s 4:5 or any layout you’re designing for.
Need just part of the image? The Crop tool lets you define exactly what you want to keep.
Step 4: Add text, overlays, or remove distractions

This is where design meets photo. Add your typography, illustrations, or shadows over the image. Want to clean up an unwanted object from the stock photo? Right-click and use Erase & Fill — Kittl’s AI will fill in the area so naturally it feels like it was never there.
You can also add a background texture or even generate a matching image using AI to complement the photo visually.
Step 5: Export in high quality

Once you’re happy with your layout, export it in JPG, PNG (with transparency), PDF, or even SVG — depending on your needs. Everything comes out high-res and ready for whatever you’re working on, from pitch decks to campaign visuals.
Key features of Kittl’s photo editor
Now that you’ve seen how to edit photo content in action, let’s break down the tools that actually make it all possible.
Kittl isn’t trying to replace Photoshop — it’s built around what designers actually need. That means the tools are focused, fast, and actually useful when you’re building real projects like client decks, social content, or brand mockups.
1. Background remover

Kittl’s AI-powered background remover is clean, quick, and surprisingly accurate. Just click once, and it neatly separates your subject from the background without rough edges or awkward outlines.
You don’t need to trace manually or toggle through complex masks. It’s a fast way to isolate elements when you want more control over how a photo fits into your layout.
New to Kittl? Try the free AI Background Remover to clean up your images instantly. You can download your result or click “Edit in Kittl” to refine it further in the full editor.
2. AI Upscaler

Working with low-res images from old libraries or web grabs? Use the Upscaler to sharpen them for print or HD use — without distortion.
Working with low-res images outside of Kittl? We’ve got you. Test out our free AI Image Upscaler and boost image quality in seconds.
4. Filters & adjustments

Instead of locking you into predefined presets, Kittl gives you full creative freedom. You control the look of your photo using intuitive sliders for brightness, contrast, saturation, vibrance, hue, blur, noise, and pixelation.
This gives you the flexibility to adjust each photo based on your layout’s needs, not force your design to match a rigid filter.
5. Reframe & resize for any format

Working with the wrong orientation? Use Reframe to extend the edges of your image while keeping the subject intact. It’s a lifesaver for resizing images for Instagram, banners, or presentations without awkward crops.
6. Image generator

Need a supporting graphic to pair with your photo? Use the AI Image Generator to create visuals that match your vibe. You can even save your edited photo as a style and generate images in that exact aesthetic. Super handy for extending campaigns or filling out layouts.
Try our free Image Generator to create custom visuals in seconds. Download them as-is or click “Edit in Kittl” to jump into the full editor when you’re ready.
7. Blend photos with design elements

You can add text, graphics, or illustrations directly on top of your photo to turn it into a complete layout. If you want the photo and design elements to feel more connected, try adjusting the opacity or using different blending modes like Multiply or Overlay.
These let colors and textures interact more naturally — so nothing looks pasted on or out of place. You can also add soft shadows to create subtle depth and keep the overall composition balanced.
8. Vectorizer

Kittl’s Vectorizer allows you to convert any image into scalable vector artwork with adjustable detail. Once you upload your image, you can use a slider to set the number of color points — the higher the number, the more color variation your vector will include.
Fewer color points result in a simplified color palette, while more points retain greater visual complexity. It’s a flexible tool that lets you customize the style and tone of your vector output based on the needs of your design.
Try out the free Vectorizer tool and see what it can do — no sign-up needed.
Photo editing use cases to try in Kittl
Photo editing isn’t just about fixing mistakes — it’s about making images work inside your design. Isolating a subject, simplifying colors, or preparing a photo for a mockup can make the whole layout feel more polished and intentional.
Let’s check out a few real examples from graphic designers using these techniques in their work.
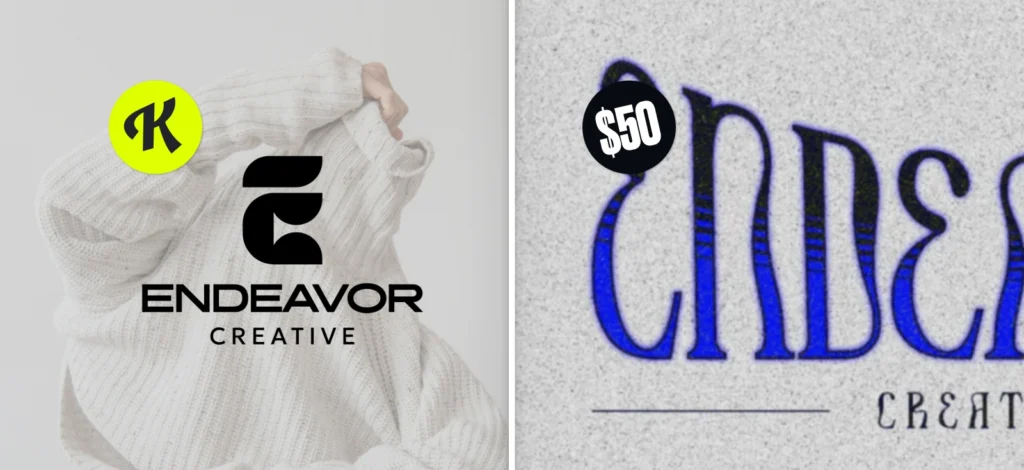
1. Clean cutouts for product shots, banner, and ad design — Yzabelle

Image from designer: Yzabelle W.

Image from designer: Yzabelle W.
Product photos don’t always play nice with design. Maybe the background feels too busy, or the lighting doesn’t match your layout. That’s why background removal can be such a lifesaver, especially when you’re working on banners or social posts.
Meet Yzabelle — she used background removal in one of her projects to pull off a clean, layered look:
Mostly, I use the background remover for mockups in marketing materials like banner ads or social media posts. For example, in this banner template project I worked on, I used it to isolate the products and the hand model from their backgrounds. This helped me create a collage-style layout that looked clean and cohesive.
Taking out the original background gave her the freedom to arrange everything exactly how she wanted—no awkward edges, no clashing colors. Just a clean, polished layout that puts the product front and center.
3. Adjusting bitmap images to fit your design — Bagus
Sometimes you’re working with a raster or bitmap image that just doesn’t feel like it belongs in the layout — maybe the background gets in the way, or the colors don’t quite match the vibe you’re going for. That’s when vectorizing can really help.
Bagus shared how he approaches it in his projects:
I usually use the vectorizer when I have a bitmap or raster object that still has a background. I isolate it by vectorizing so I can adjust the object more easily to match the design’s aesthetic. I’ll usually tweak the colors afterward in Kittl to make sure everything fits.
Vectorizing gives you more control. You can fine-tune the colors, clean up the shape, and make the image feel more at home in your design — without starting from scratch.
This approach works especially well when you’re building designs that rely on stylistic consistency — like illustrations for brand assets, event materials, or limited-palette artwork.
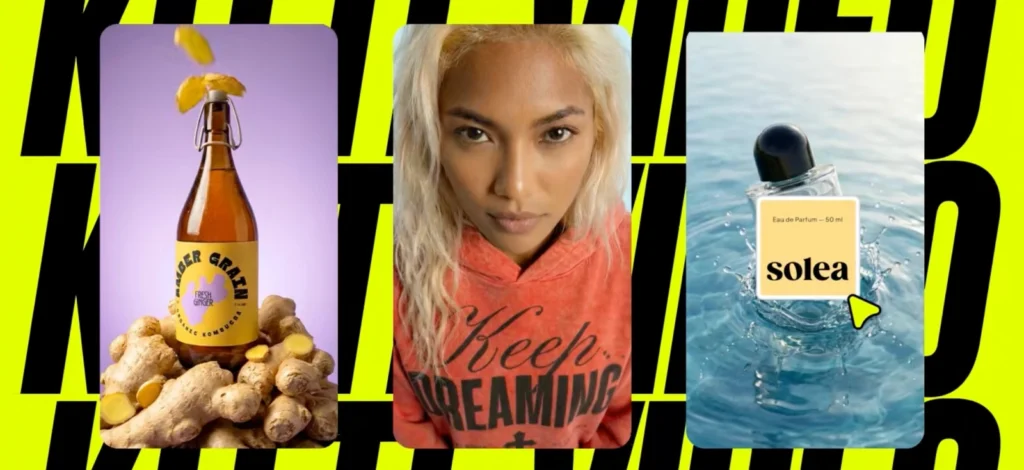
2. From photo edits to polished mockups — Anna
Image from designer: Anna D.

Image from designer: Anna D.

Image from designer: Anna D.
Once your photo is cleaned up, cropped, or isolated — it often becomes part of something bigger. That might be a promotional graphic, a product preview, or a social media post. That’s where mockups come in.
Unlike other platforms where you need to save and reupload just to test a design, mockups in Kittl update in real time. You can adjust background colors, swap designs, and preview different styles without leaving the editor. This makes it easier to create sharp, realistic visuals — especially when you’re working on product images, ad creatives, or shop content.
As Creative Director Anna Ditmer puts it:
“I think it’s great how the quality evolves and we get more and more mockups for graphic designers to use. I especially love the new style sets because it can be so hard to find matching mockups to use for presentation.”
ANNA DITMER, CREATIVE DIRECTOR AT kITTL
These new mockup sets are designed to work together visually with your photos and designs—so whether you’re presenting to a client or prepping your storefront, your images stay consistent across the board.
Mockups with dynamic angles and subtle perspective warps help designers move beyond flatlays, making it possible to build a whole set of assets in just a few clicks. With exports up to 3000px, everything comes out crisp and ready to share.
Quick answers to common photo editing questions
Still figuring things out? Let’s clear up a few things about editing, exporting, and getting started.
Can I edit a photo for free in Kittl?
Yes — you can start editing photos in Kittl for free, with no sign-up required. On the Free plan, you’ll have access to core editing tools like cropping, filters, brightness/contrast adjustments, and adding text or elements to your photo.
However, some advanced features like background removal, high-resolution downloads, and AI-powered tools (like the Upscaler or AI Background Remover) are only available on the Pro and Expert plans. You’ll also need a paid plan to download designs with transparent backgrounds or to access commercial licensing.
It’s a great way to test the platform before upgrading for professional use.
What export formats are supported?
Kittl supports a range of export formats designed to fit your workflow:
- JPG – Great for web, social media, and everyday use
- PNG – Ideal for transparent backgrounds (Pro/Expert only)
- PDF – Best for print projects, presentations, and portfolios
- SVG – Available for designs with scalable vector elements
You can also choose between low, standard, and high resolution depending on your plan. The Expert plan allows for the highest-quality exports, including options for scaling your designs up without losing detail.
Does Kittl replace Photoshop?
Not exactly — and it’s not trying to. Photoshop is built for deep, pixel-level editing and complex compositing. But most graphic designers don’t need all of that every day.
Kittl is for the designer who wants to:
- Edit photos fast without leaving their design tool
- Add text, illustrations, or effects without toggling between apps
- Remove backgrounds or adjust photo aesthetics for branding, mockups, or content
It’s more intuitive, more focused, and completely online. For layout-driven tasks like flyers, social posts, posters, and presentations, Kittl offers everything you need—with a lot less friction.
If Photoshop is your studio, Kittl is your smart, go-to workspace for fast visual work.
Master how to edit photo content without slowing down your design process
Photo editing doesn’t have to feel like a separate job. When you’re able to adjust lighting, clean up images, and blend photos seamlessly into your layout — all in the same space — it becomes part of the creative process, not a detour.
That’s the core of how to edit photo content efficiently: keeping it simple, flexible, and connected to your design work.
Kittl gives you that space. And once you try it, you might wonder why it ever felt more complicated than it had to be.